Black mold in shower grout and caulk is common, and it is more than a cosmetic problem. In sensitive people it can bring on allergy-type symptoms, and the fungus damages the materials it grows on. Below is how to tell a surface stain from mold under the caulk, how to clean it, and when the caulk has to be cut out and replaced.
Why mold grows in grout and caulk
There is always one reason mold shows up: too much moisture together with poor ventilation. In a bathroom it appears on tile grout lines, under the caulk at the joints of the tub and sink, on shower curtains and in corners where air barely moves. If the source of the moisture is not removed, mold will come back again and again. The fungus can also grow on wooden surfaces that are regularly in contact with water.
Quite often a caulk with low-grade components is used during a bathroom remodel, so moisture gets through the joints, collects on the surface and becomes food for the fungus. The quality of the caulking work itself also plays a big part. That is why the EPA puts the water problem first: fix the leak or the dampness, then deal with the mold. If water keeps getting in under the tub or the shower floor, read about why a shower pan keeps leaking before you start scrubbing.
A surface stain vs mold under the caulk
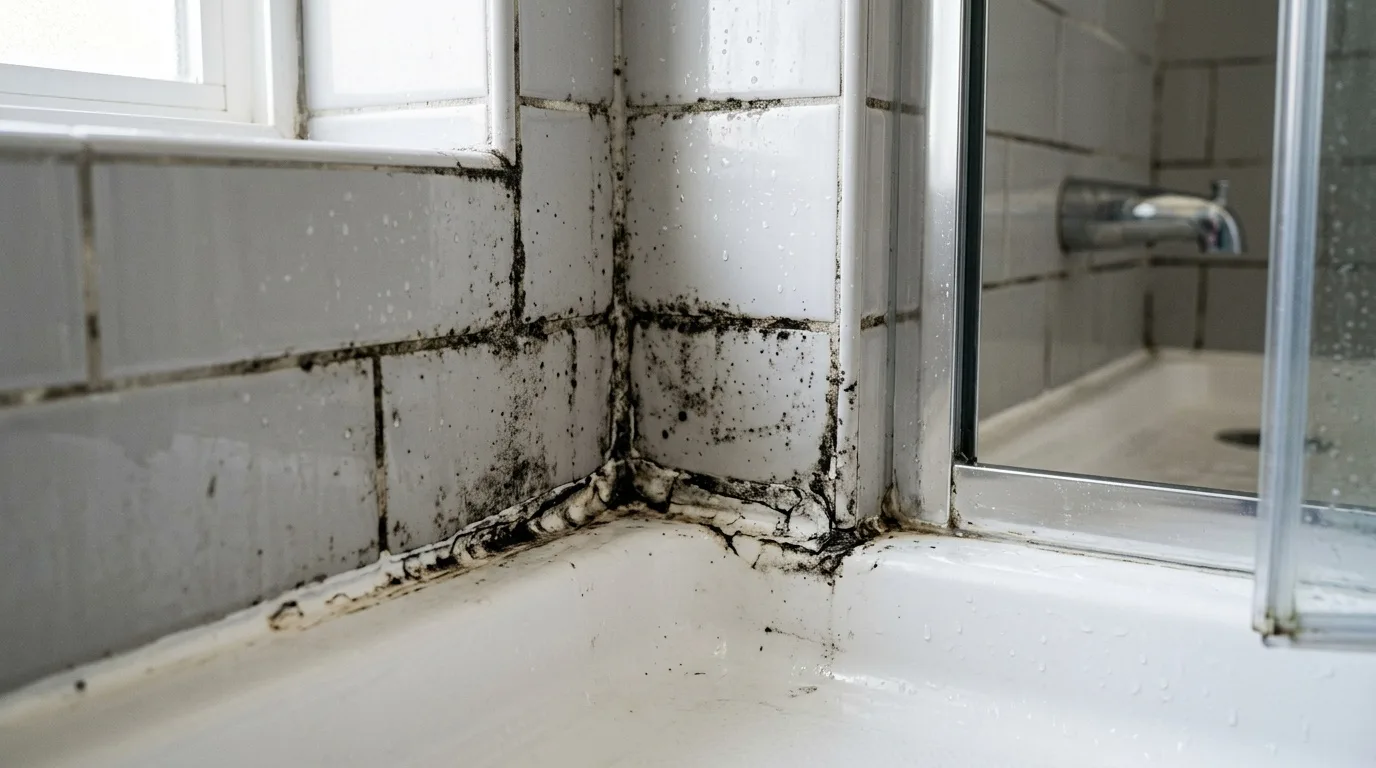
The earlier the fungus is noticed, the faster and easier it is to get rid of. Most often, mold that has only started to spread in a bathroom looks like even, round black dots on the caulk or the grout. Later the dots grow, merge with each other and take over more and more of the surface.
Fresh, small spots on a smooth surface can usually be cleaned off. Mold that has eaten deep into the grout lines or got under the caulk is another matter: household cleaning will not reach it. If the black stays inside the bead after cleaning, the fungus is in the material, not on it.
Black mold in shower grout: how to clean it step by step
Removing mold starts with removing the fungus itself. The EPA advises scrubbing mold off hard surfaces with detergent and water and then drying them completely. If the moldy area is under about 10 square feet, you can often handle it yourself.
- Air out the bathroom well before you start, so there are fewer spores in the air.
- Scrape the visible layer of mold off the grout lines, joints and surfaces with a stiff brush or a putty knife.
- Wash the caulk and grout with an ordinary cleaning product, rinse well with water and dry thoroughly with a cloth.
- If you use a ready-made product against mold and mildew from a hardware store, apply it to the affected area and along the whole length of the caulk. Follow the instructions strictly, without going over the stated dose and time.
- Rinse with warm water and dry the surface well again.
- Leave the bathroom door open afterward.
Protect yourself while you work
- Wear gloves, safety glasses and a respirator, so you do not breathe in spores or chemical fumes.
- Use one product at a time and read its label.
- Ventilate the room once the cleaning is done.
Moldy shower curtains can be soaked for a few hours in a solution of vinegar and water and then washed. For the regular care of the walls, see how maintaining bath tiles is easy.

When to cut out the caulk and recaulk the bathtub
Keep an eye on the condition of the caulk. If it has darkened or cracked, it has to be cut out and replaced with new caulk, otherwise the mold will keep coming back. If none of the cleaning methods beat the fungus, you can conclude it has gone deep into the joints. Then it is time for a bigger fix:
- Carefully cut out the old caulk with a knife.
- Thoroughly remove everything that has collected under it.
- Disinfect the surface, following the product's label.
- Rinse with water and wipe dry.
- Apply new caulk to the cleaned areas.
The EPA is clear on one point: do not paint or caulk over moldy surfaces. New caulk on top of old mold in bathtub caulk only hides it for a while.
Preparing the joint
Careful surface preparation makes the caulk last longer and lowers the risk that it peels away. Do these steps in order:
- Remove all of the old caulk.
- With a scraper, a putty knife or a brush, remove what is left of the dirt: dust, grime, mold and so on.
- Clean the surface with a suitable product, for example soapy water, then rinse it off thoroughly. Do not use linty or dirty rags.
- Degrease the surface with a solvent that is compatible with the material.
- Let the joint dry completely and wait long enough after the degreaser.
- If needed, put painter's tape along the edges of the joint, as straight as you can.
- If the manufacturer recommends a primer, use the one meant for your surface.
Which caulk to choose
For most joints in a bathroom, a 100% silicone kitchen and bath caulk is suitable. Its main plus is that it contains fungicidal additives that hold back the growth of mold and microorganisms. It will not give one hundred percent protection, though. The room has to be kept clean, excess moisture removed and normal ventilation provided; otherwise a black film will appear even on the most mold-resistant bead.
If you have a tub, a 100% silicone kitchen and bath caulk works well, but the tub material matters. If it is acrylic, make sure ahead of time that the caulk is compatible with it. If the tub is cast iron or enameled steel, you need a product that suits enamel and the materials next to it. For a shower stall, a mildew-resistant 100% silicone kitchen and bath caulk with neutral cure is a good choice. Check on the tube that it says where it can be used, whether it is mold-resistant, and the time for skin formation and full cure.
Caulking a bathtub: how long to dry
If you touch the caulk with your finger and it feels hard, that does not yet mean the layer has fully dried. Forming a surface skin and full curing are two different things. Curing time depends on many factors: the thickness of the bead, the humidity in the room, the product used. On average caulk most often cures in a day, but it can take longer; silicone in some cases needs two days, and polyurethane caulk even more. There are also fast-curing formulas, including ones for showers. Always check this on the label. The best temperature for curing is about 65-75°F, and the humidity should not be high. Keep water off the bead until it has cured.
Porous grout: sealing it or coating over it
Grout is porous. It soaks up water and everything else that gets on it, and the fungus eats into it and works its way under the tile, breaking down the grout and the wall behind it. Over time the tile starts to come loose.
As prevention, the joints and grout lines can be treated regularly with an antifungal product. Clean, dry grout can also be sealed with a grout sealer; it is not mandatory, but it makes the lines absorb less. When the grout is stained through and the tile itself is worn, a coating over the whole wall is another option: tile reglazing for bathroom walls covers the tile and the grout lines with one surface. A coating, like caulk, goes only over a surface that has been cleaned of mold and dried.
Clean the mold, dry the joint, and only then caulk, seal or coat - never over mold.
Airflow in windowless NYC bathrooms
Mold does not appear where it is dry, so prevention comes down to ventilation and removing moisture. Many apartment bathrooms in New York have no window, and that is where it matters most.
- Air out the bathroom for at least 15-20 minutes after every use. If the ventilation is poor, use a fan or a dehumidifier. Check regularly that the exhaust actually works and clean it when needed.
- If there is no built-in ventilation, do not keep the door shut tight - the air has to move.
- Wipe down the walls and surfaces after a shower or bath, especially the joints between the tile and the fixtures.
- Do not leave wet towels inside for long, and do not leave buckets or other containers of water and damp rags in the wet zone. Dry towels outside the bathroom if you can.
A shower base that stays damp and stained is often a sign of water standing where it should drain. Our pages on shower pan repair and refinishing and shower stall reglazing services explain what can be done with the base itself. After a refinish, follow the right way to clean a reglazed surface.
Is black mold in shower grout dangerous?
In high humidity and warmth the fungus spreads faster, and a small closed room raises the concentration of spores in the air. In sensitive people, mold can cause hay fever-type symptoms such as sneezing, a runny nose, red eyes and a skin rash, and it can trigger asthma attacks in people with asthma who are allergic to mold.
This is general information, not medical advice; if someone in the home has symptoms, talk to a doctor.
Renters: who has to fix mold in the bathroom
In New York City, NYC HPD rules on indoor allergen hazards (Local Law 55) apply to buildings with three or more apartments. The owner has to inspect units for mold every year, and a vacant apartment has to be handed to the next tenant free of mold. If a tenant finds mold, the first step is to tell the landlord; if nothing is done, the next step is to call 311. The cleaning advice from the EPA guide to mold cleanup in your home applies to anyone, owner or renter.
For homeowners in Brooklyn, including bathroom refinishing in Coney Island, and across the other boroughs, a tub or tile wall with stained grout can be looked at before you decide between recaulking and a new surface. Send a question through our contact page for a consultation.